搭建maven私服主要是为了方便在一个团队中使用maven中央仓库没有的jar包,这些非中央仓库的jar包可能是自己团队开发的公共依赖jar包,可能是第三方私有的认证相关jar包,特殊的还有oracle的驱动jar包,下面是使用Nexus搭建maven私服及私服使用
Nexus3.x安装及配置
前置条件要求存在jdk1.8的环境
下载
这里之所以要特地提下下载是因为这个东西是真难下,我的电脑本身一直没有安装过专门的下载工具(度盘不算),一般下载都是走网盘或者浏览器直接下载,这次无论度盘的离线下载还是浏览器下载都非常慢甚至下载失败(100M光纤),在服务器上使用wget同样很慢,最后安装了迅雷使用迅雷下载后速度快很多,看来下载确实需要专业的下载工具,下载完成后上传到服务器上即可,当然也可以直接在服务器上使用wget下载,如果不嫌弃下载的慢的话:
官方下载页:
实际资源地址
安装及配置
|
|
上面启动成功后会警告不要使用root用户启动,这里可以新建一个用户,也可以指定root用户启动,使他不出现警告,下面配置指定root用户启动
手动更新索引(可选)
我这里没有下载索引,以前配置过nenus2.x时下载过全部索引,很大很慢,下载了一晚上,不下载索引并不影响使用,这里会同步当前项目使用的依赖到私服的索引中,有新的依赖从私服中获取也会更新对应的索引,下面介绍一种离线安装的方式
前往maven中央仓库下载 indexer-cli-5.1.1.jar 解压工具包
下载离线索引文件
12nexus-maven-repository-index.gznexus-maven-repository-index.properties将3个文件放在同一目录下解压
1java -jar indexer-cli-5.1.1.jar -u nexus-maven-repository-index.gz -d indexer拷贝索引
nexus2.x拷贝到{nexus-home}/sonatype-work/nexus/indexer/central-ctx
nexus3.x拷贝到/sonatype-work/nexus3/blobs/default,3.x我没尝试过参考这篇博客
web界面
- 访问web界面,使用默认管理账号admin/admin123登录
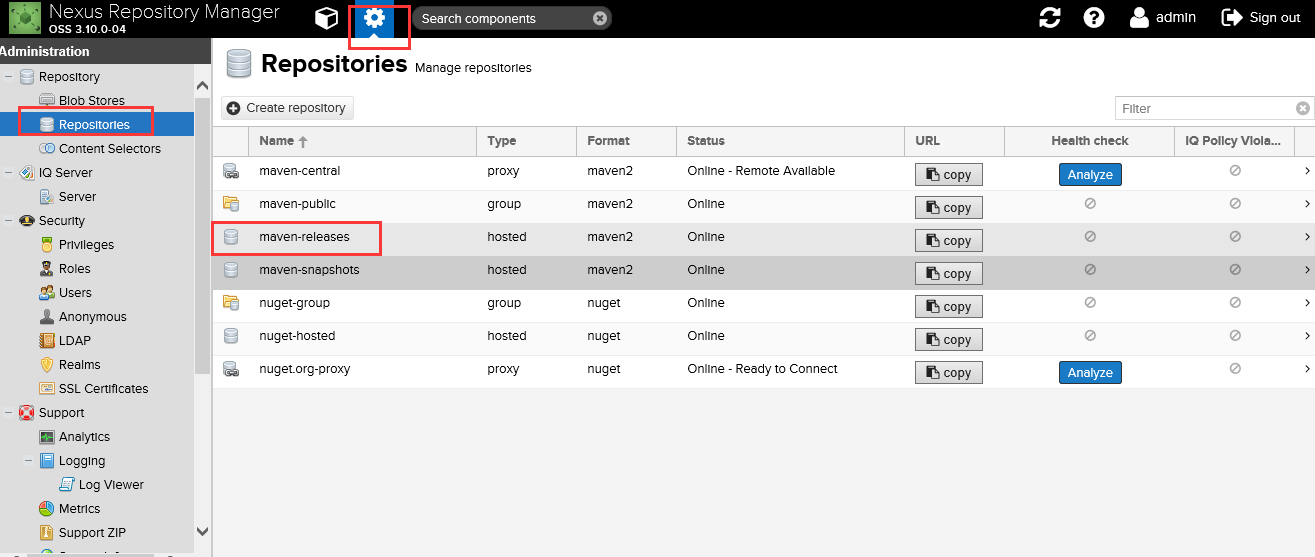
http://192.168.16.30:8081/ 仓库浏览在左侧菜单栏Browse,这里有多种仓库,相比于nexus2.x精简了很多仓库
12345678910111213nexus仓库类型Group:这是一个仓库聚合的概念,用户仓库地址选择Group的地址,即可访问Group中配置的所有仓库资源,访问顺序取决于配置顺序3.x默认Releases,Snapshots,Central,可在web页面配置在web界面点开Hosted:私有仓库,专门用来存储我们自己生成的jar文件3rd party:未发布到公网的第三方jar (3.x去除了)Snapshots:本地项目的快照仓库Releases: 本地项目发布的正式版本Proxy:公网上发布的jar 例如:springCentral:中央仓库Apache Snapshots:Apache专用快照仓库(3.x去除了)配置Releases版本可重复上传
点击图片画框部分配置Releases: Deployment pollcy –> Allow redeploy
使用nenus本地maven配置
全局配置下载依赖(即项目pom无需配置)
在maven的setting.xml文件中配置私服配置,这种方式配置后所有本地使用该配置的maven项目的pom文件都无需配置私服下载相关配置
|
|
激活使用上面的配置
指定镜像代理为我们的私服
单独项目下载依赖(即项目pom文件中配置)
这种配置是修改单个项目的pom文件,无需修改maven的setting配置
建议使用全局的setting配置,一个项目组共用一个maven的setting配置,项目中就无需配置下载相关的私服仓库配置
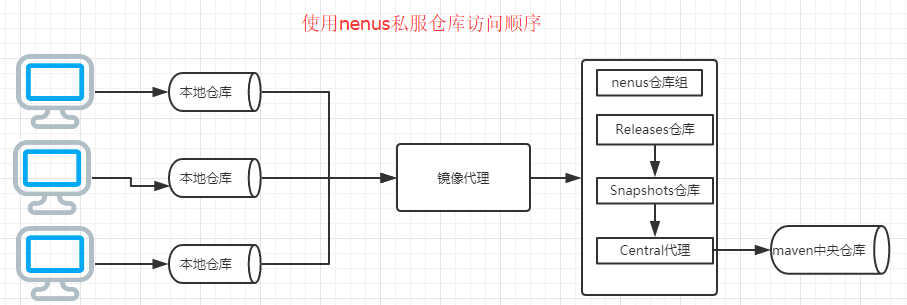
使用私服后仓库访问顺序
上传jar包配置
对于中央仓库没有的jar包,需要我们自己将jar包发布到私服中去,其中jar包主要分为两类,一类是本地自己开发供给项目组其余同事使用,这种直接配置项目的pom文件和maven的setting文件,之后deploy发布即可发布到,另一类是第三方jar包,可以直接使用web页面上传并设置对应GAV即可
本地maaven开发的项目上传配置
maven的setting文件配置
这里要配置配置上传用户及仓库信息,我这里直接使用了admin用户,在nenus2.x中还内置了一个deployment/deployment123用户,在3.x该用户被移除了,这里可以自己配置角色和用户,我就直接使用admin用户了123456789101112<servers><server><id>nexus-releases</id><username>admin</username><password>admin123</password></server><server><id>nexus-snapshots</id><username>admin</username><password>admin123</password></server></servers>项目中的pom文件配置
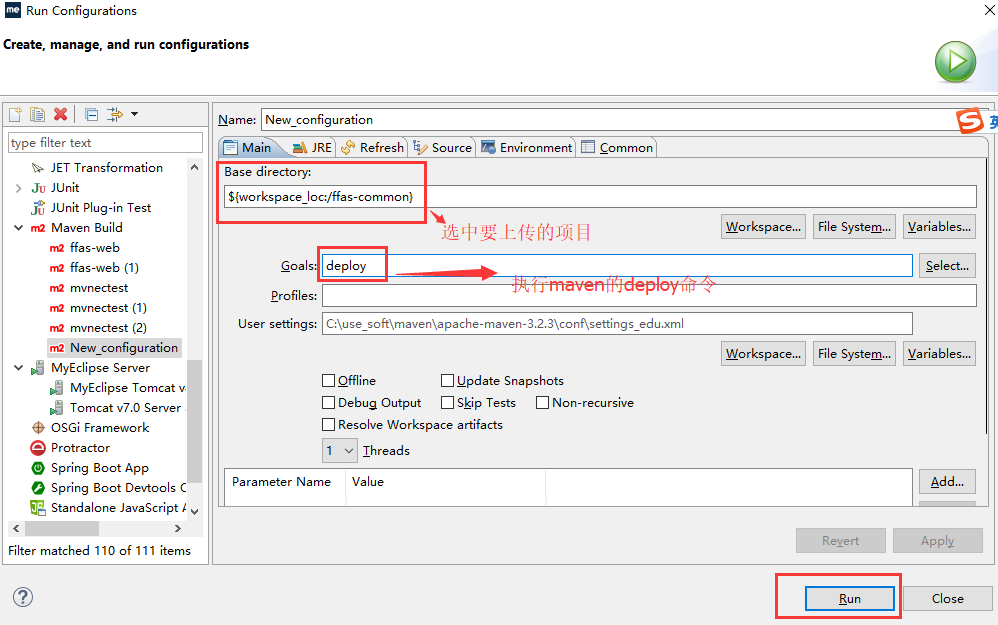
123456789101112<distributionManagement><repository><id>nexus-releases</id><name>Nexus Release Repository</name><url>http://192.168.16.30:8081/repository/maven-releases/</url></repository><snapshotRepository><id>nexus-snapshots</id><name>Nexus Snapshot Repository</name><url>http://192.168.16.30:8081/repository/maven-snapshots/</url></snapshotRepository></distributionManagement>执行maven的deploy命令
这是myeclipse中上传本地项目jar到私服,IDEA中更为简单直接点击maven周期中的deploy即可
出现uploading信息并且没报错说明上传成功
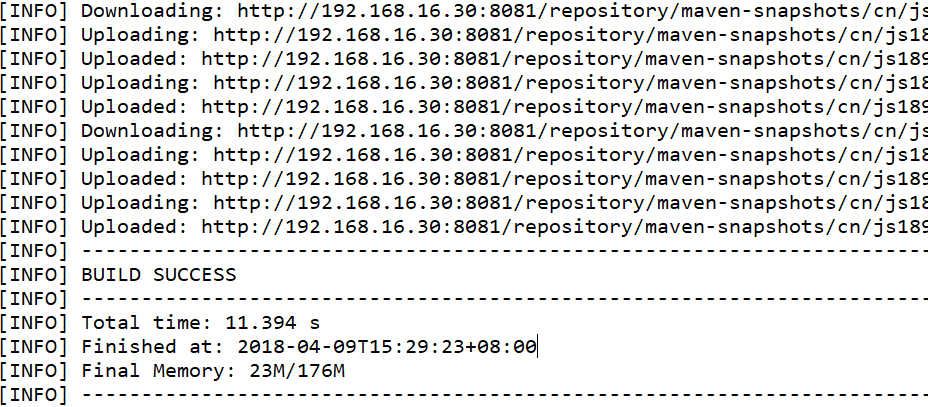
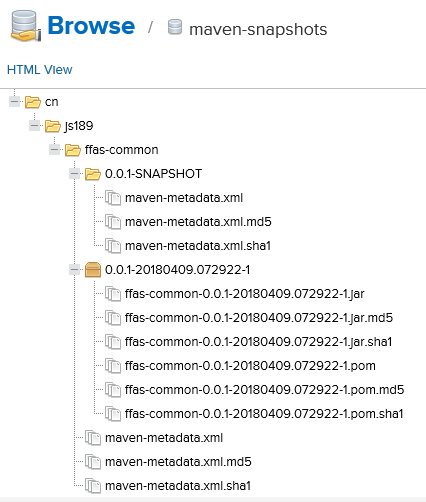
到对应仓库查看
注意:
这里只有Snapshot的仓库上传成功,Release仓库并没有上传成功,这是因为版本号名称结尾有SNAPSHOT,默认以这个结尾是不会上传到Release仓库去的,去除就会上传到Release仓库且不会上传到快照仓库
Release仓库默认不支持重复发布,可配置
注意setting中server标签下的id要和pom文件中仓库配置的id相同,即指定上传到哪个仓库
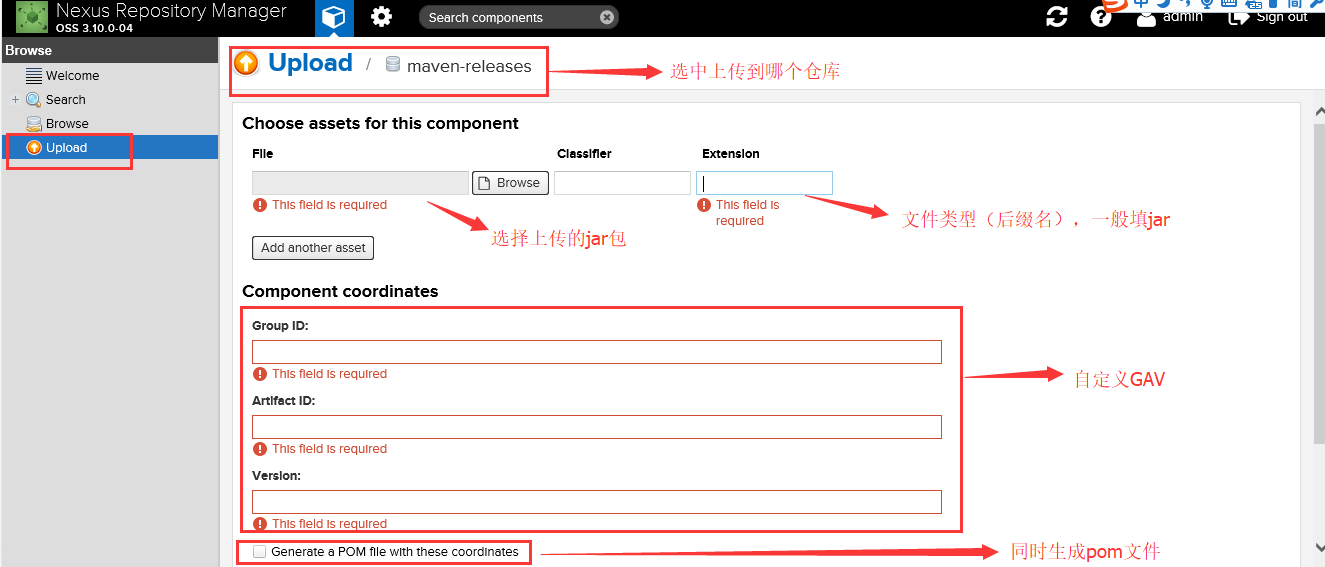
第三方jar包上传
对于第三方jar包的上传采用nenus提供的web界面上传,上传成功后需要使用该jar包的话,依赖中填写自定义的GAV即可